.png)
.png)
VR Starter Kit
Making VR more accessible at Pratt Institute by reimagining onboarding for creative students with diverse skill levels and interests
(See more)
Prof. Mindy Eng (Advisor)
VR equipment at Pratt goes under-utilized
Pratt Institute School of Design purchased VR headsets that students can borrow. However, they remain unused. Students are interested in using VR as a creative tool, but learning on their own is difficult.
We need a sustainable institute-wide solution that is low-cost and requires minimal staff support
We envisioned a long-term solution, so it needed to require minimal staff effort. For example, we aimed to avoid the need for staff to fully teach students how to use VR each time. We also prioritized using resources already available at Pratt, such as Google Sites, to minimize costs.
Create scalable, inspiring, and bite-sized tutorials relevant to designers at Pratt
Our research group’s mission was to create pathways for students to develop a relationship between VR and their own creative process by helping them know the basics, its potential, and ways to design with VR.
On demand, 2-level tutorials with multi-format instruction for self-paced VR exploration
We created a starter tutorial for first-time VR users and 3 advanced tutorials to help students begin creating in VR.
.png)
.png)
Starter Tutorial

Sites
The starter tutorial teaches students how to use VR from the beginning, such as how to put on a VR headset, use controllers, and set a boundary.
.png)
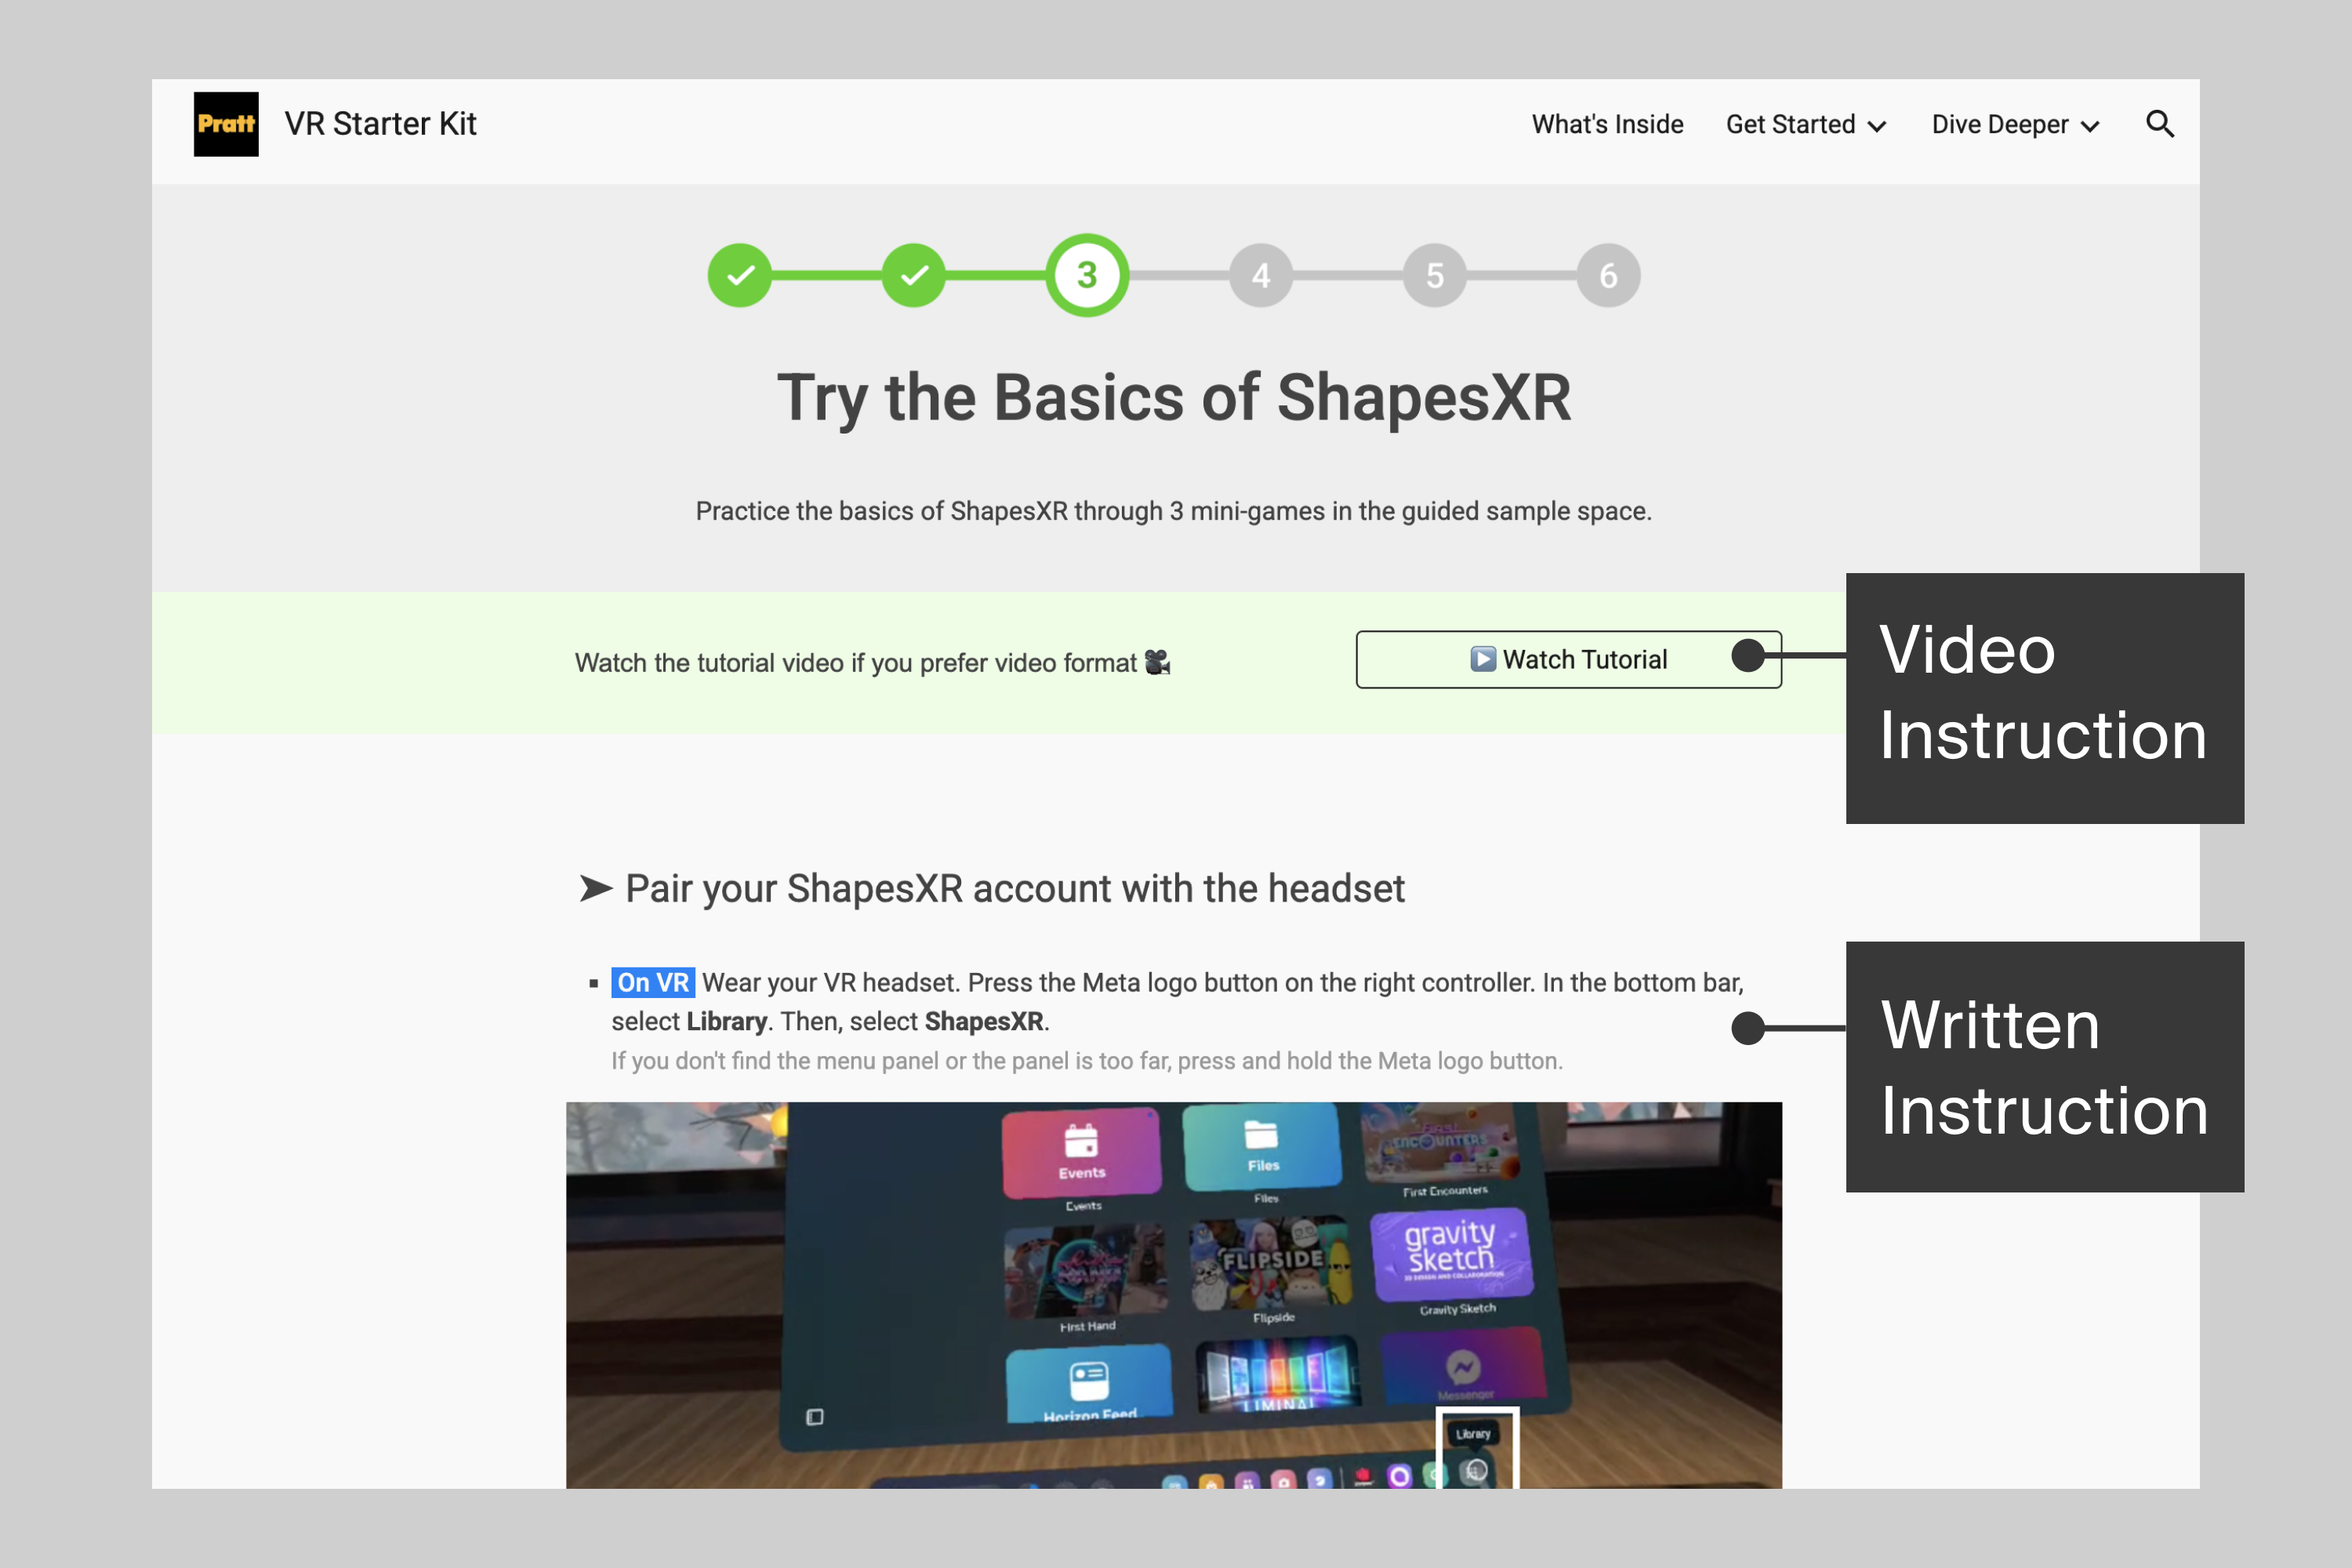
User testing with 20+ students showed diverse format preferences, so we provided video, written, and audio instructions to support seamless learning.
.svg)
.svg)
.svg)
We curated 5 inspiring, easy-to-use, existing VR apps to highlight what VR can do.

.gif)
1. See how VR can feel real very quickly

.gif)
2. Discover how VR shifts your emotions

.gif)
3. Experience how VR evokes the senses


4. Let VR transport you to new places

.gif)
5. Explore your creativity in VR
Advanced Tutorials
30min (interview)
Sites
.png)
We explored how VR can support creative workflows and designed 3 tutorials to demonstrate how it can enhance the design process: 3D prototyping, 3D modeling, and interview practice.
* Our team split the work: I focused on the 3D prototyping tutorial, my coworker on the 3D modeling one, and we collaborated on the interview practice tutorial.
The tutorial offers students hands-on experience in 3D prototyping using ShapesXR, an industry-standard XR tool, through a project focused on creating their own virtual portfolio exhibition.

.png)


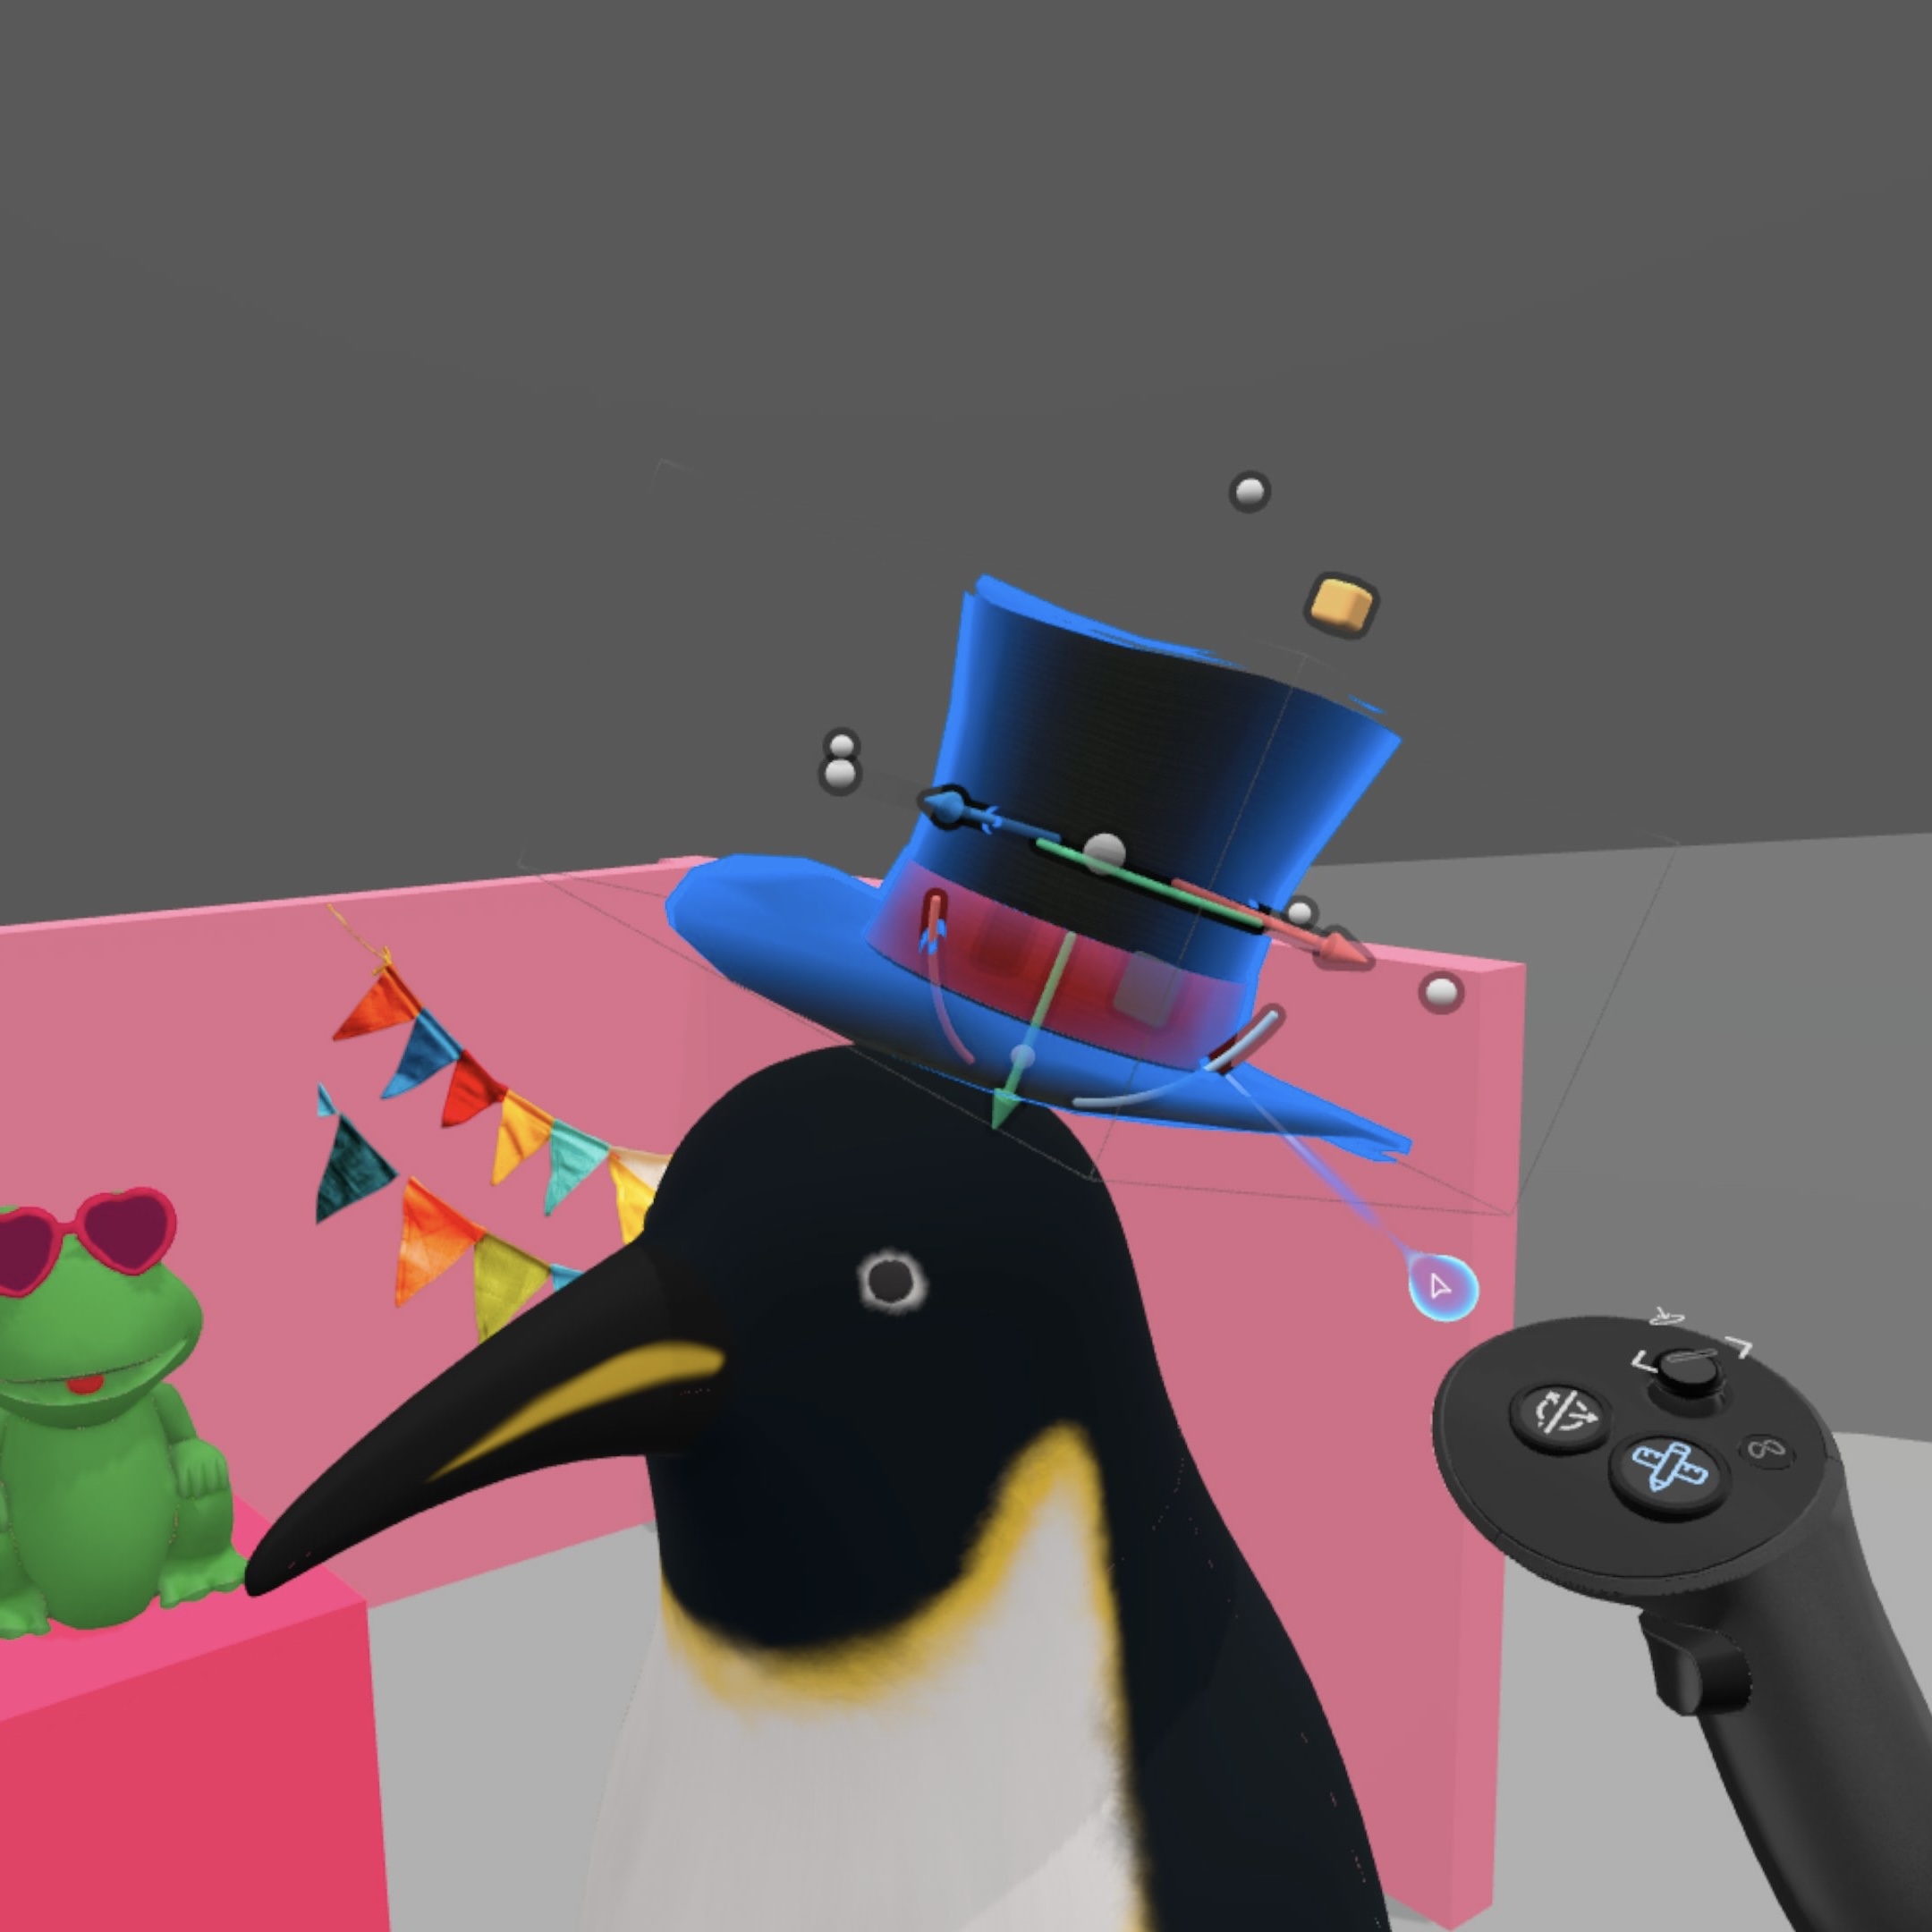
I paired in-VR tutorials with a website. The 3D space I built from scratch in ShapesXR is themed like a real museum. I also designed mini-games that help students learn basic features, such as grabbing objects, in a more fun and interactive way.
.svg)
.svg)
In this tutorial, students use Gravity Sketch, a 3D sketching and modeling tool, to create a simple 3D character with side-by-side references and audio instructions.
* This tutorial is my coworker's scope.

This tutorial introduces students to VirtualSpeech, an AI-powered virtual public speaking tool for practicing interviews, whether for design research, job applications, or personal interest.
* This tutorial is collaborative work.

Launched Pratt’s first comprehensive VR onboarding resource


Here's how I created the advanced tutorial👇
Researched how VR can help creative students and identified the best VR creative tools to teach.
We researched 33 VR apps to understand how VR could support students' creative processes across disciplines and identify the most accessible starting points. Based on this, we selected ShapesXR (3D prototyping), Gravity Sketch (3D modeling), and VirtualSpeech (public speaking) for our tutorials.
.png)
How might we craft quick, accessible, and engaging tutorials that show students how to design with VR in ways that inspire discovery and exploration?
Designing with 4 key approaches
After identifying the VR tools to teach during the research phase, I designed the tutorial. The initial iteration of the tutorial was guided by the following 4 key approaches across the following areas.
Inspire and engage design/art students through portfolio exhibition building experience
The tutorial is about creating a life-sized 3D exhibition space where students can import and showcase their work. I aimed to tailor the tutorial to design/art students, aligning with their interests and making it relevant and engaging. Since portfolios are a common interest among them across various creative disciplines, I chose this prompt.

Immersive, and multimodal learning experience with website and VR formats
I used both a website and VR for the tutorial. Google Sites serves as the entry point, providing written and video instructions for steps students need to complete on their computer, such as account setup. For the main instructions, I created a ShapesXR tutorial space inside VR, as students cannot easily access the website while wearing a headset. They can duplicate & use this sample space, which includes step-by-step audio and written instructions on VR.
%20(1).png)
Seamless and structured learning experience
The experience consists of setting up (Website & VR), practicing basic feature (VR), and exhibition building (VR). By gathering all the website setup tasks first, I aimed to create a seamless transition from the website to VR, minimizing the need to switch between devices. Additionally, by separating the practice and exhibition building phases, I designed the tutorial to encourage students to take breaks in between phases and maintain focus.

Design an inspiring and functional VR space that guides users along the intended path
I designed the space to enhance onboarding both functionally and aesthetically. To ensure a clear instructional flow without confusion, I got inspiration from museums, where space guides visitor movement. Also, since students may not know how to move at first, I placed key instructions within their immediate view, requiring no movement. Aesthetically, I created a museum-like environment and incorporated yellow, Pratt Institute’s primary color, to align with the stakeholder’s branding.
.png)
Students navigated in unexpected ways
I conducted the first round of testing with 3 students, observing how they explored the tutorials independently and identified 2 key insights.

How might we improve the tutorial to make it feel shorter and less frustrating, while encouraging linear exploration?
.png)
.png)
Enhanced the stepper to keep students on track
The tutorial required a specific step order, but students were unaware of this. It was also hard for them to tell which step they were on within the website and which device to use to complete the step (PC or VR). To fix this, I made the stepper clearer and added tags indicating which device to use for each step.
.png)
.png)
Let students put on the VR headset sooner
I originally included all PC setup steps at the beginning to create a seamless transition from the website to VR. However, many students were eager to put on the headset right away, and the lengthy setup caused frustration and disrupted the intended flow. To address this, I revised the user flow to let them start using the headset 15 minutes earlier.
.png)
.png)
Gamified the practice phase to make the tutorial engaging and keep students' attention
In ShapesXR, learning basic features like teleporting, grabbing, and transforming objects is essential. However, students found our original tutorial too monotonous. To address this, I designed three interactive mini-games that teach the basics in a more engaging way.
.png)


User flow
.png)
Website

Instruction

VR Tutorial Demo


Instruction

Instruction
Made the tutorial feel shorter and more engaging, increasing interest and expanding students’ perspective on VR
I conducted a second round of testing with 4 participants. All gave positive feedback on the tutorial length, suggesting the experience was engaging. It also broadened participants’ understanding of VR and increased their interest in using it creatively, successfully meeting our initial goals.
We noticed students want to dive into VR, but they need more guided support to commit to deeper exploration
Through interaction with students, we learned that many students are interested in exploring VR. However, when it comes to learning more advanced tasks, such as designing, casual learners are often not ready to invest the time, while serious learners need both self-guided and in-person support to build confidence and stay focused.

We’re going beyond on-demand tutorials and exploring what students need to thrive with VR
We recognized the importance of offering diverse forms of support beyond self-guided tutorials. This led us to ask: What kind of support do students actually need? To answer this, we held a co-creation workshop with our testing participants to brainstorm VR’s strengths, challenges, and opportunities. In the future, we plan to expand support at the Pratt VR Lab based on ideas from the workshop.


%20(2).jpeg)
.jpeg)
Journey map
We also created the journey map.

Style Guide
We made a style guide to keep the consistency of the product.

We prioritized the issues identified during testing and refined our design to address the critical ones.
After finding 47 issues, we sorted and prioritized the issues to maximize improvements within a limited timeframe. We considered factors such as how many participants encountered the same issue and whether the issue impacted key or subsequent steps. (I applied my knowledge gained from work experience as a software developer here!)
.png)
.png)

%20(1).png)
%20(1).png)